Wheat Development
What is Jointing?
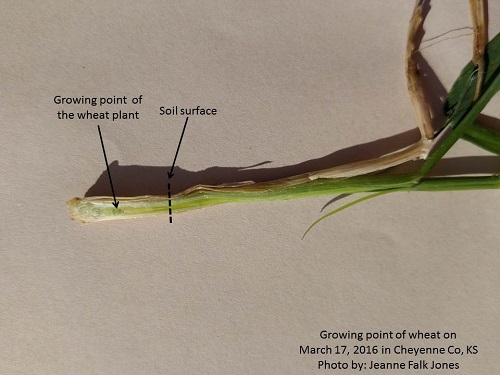
Jointing is the point in the wheat's life cycle when the growing point moves above the soil surface.
At this point, the stem is beginning elongation and the tiny wheat head in the main stem and
each tiller is moving up the stem.
Why is it important?
This is a very busy time for a wheat plant. As the head begins to move up the stem, the maximum
possible of kernels per head is determined at this time. The plant allocates nutrients to the main
stem and tillers with at least three leaves. Once the plant has jointed, typically no more potential
head-bearing tillers will form.
However, if the growing point has been killed during stem elongation, as a result of damage
(physical, freeze, pests) to the immature head and supporting system, the main stem or tiller
will die. As a result, the wheat plant will tend to compensate for the loss by development of
new shoots from the base of the plant.
Wheat Growth and Development - Feeks Stages
Feeks 1.0 - Emergence, one shoot formed.
Feeks 2.0 - Beginning of tillering
Feeks 3.0 - Tillers formed
Feeks 4.0 - Beginning of erect growth, leaf sheaths lengthen
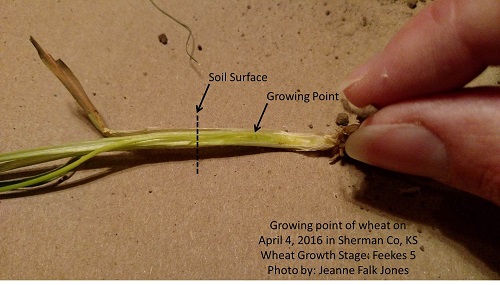
Feeks 5.0 - Leaf sheaths strongly erect
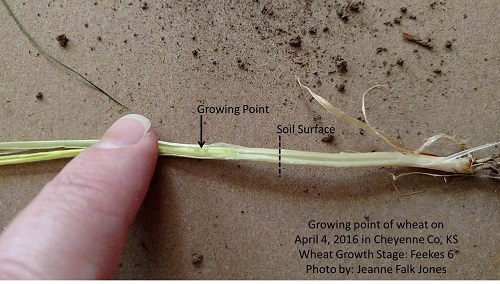
Feeks 6.0 - First node is visible
Feeks 7.0 - Second node visible, next to last leaf visible
Feeks 8.0 - Flag leaf visible
Feeks 9.0 - Ligule (collar) of flag leaf visible
Feeks 10.0 - Boot stage
Feeks 10.1 - awns visible, heads emerging though slit of flag leaf sheath
Feeks 10.2 - heading 1/4 complete
Feeks 10.3 - heading 1/2 complete
Feeks 10.4 - heading 3/4 complete
Feeks 10.5 - heading complete (harvest restriction for many fungicides)
Feeks 10.5.1 - beginning flower (bloom occurs 4 to 5 days after heading)
Feeks 10.5.2 - flowering complete to top of spike
Feeks 10.5.3 - flowering complere to bast of spike
Feeks 10.5.4 - kernels watery ripe
Feeks 11.0 - Ripening
Feeks 11.1 - milky ripe
Feeks 11.2 - mealy ripe
Feeks 11.3 - kernel hard
Feeks 11.4 - harvest ready
Adapted from Texas A&M publication SCS-1999-16. Click here for full version of the publication.
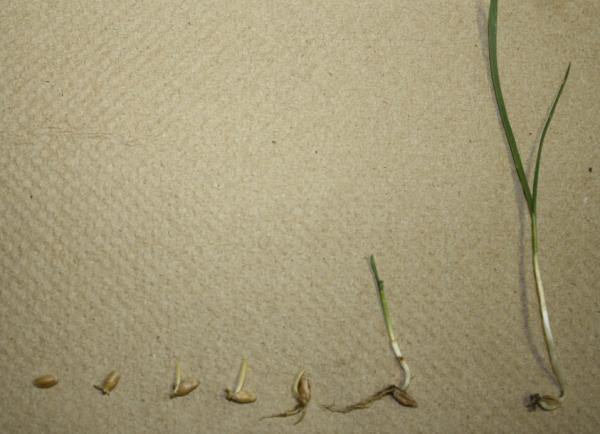
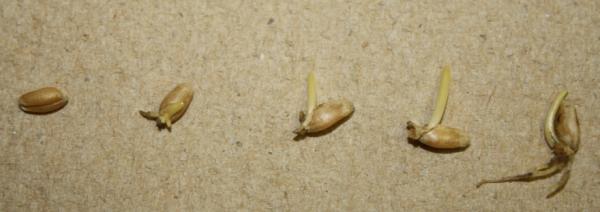
After the seed is planted, it goes through a process called imbibing, or water absorption. This process hydrates
the seed and allows it to begin germination. When this is happening, if you press a fingernail into the side of
the seed, a small dent in the seed coat will result. If the seed has not started to absorb water, there will be no
dent.
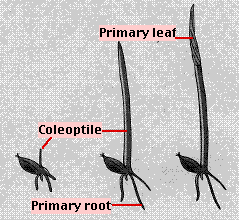
The drawing and picture below shows the emerging coleoptile and roots. Normally, after a few days of being
fully hydrated, the seed will begin to show development. First roots will begin to grow and then the coleoptile.
The root development is first difficult to see, but the roots become more prominent as the coleoptile gets larger.
The coleoptile is a protective covering over the shoot and leaves. It is white to light green in color and grows
toward the soil surface. It shields the developing leaves until it reaches the surface. The energy to support this
growth process is supplied by the seed. As these structures continue to develop, the seed will begin to appear
shriveled.
|
|
 |
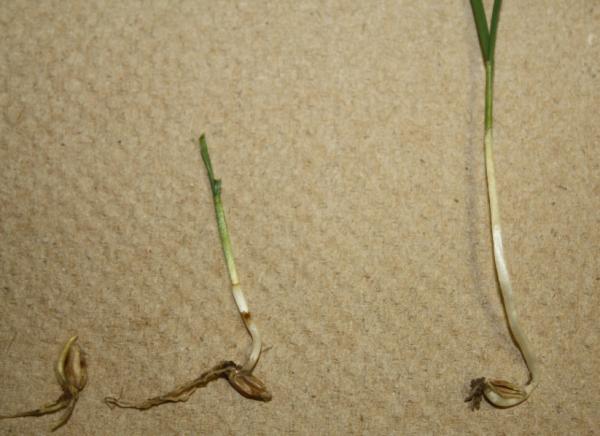
As the coleoptile emerges out of the soil, green leaves push past the protective covering. During this time,
the primary roots continue to grow and develop. As the roots grow, they take in water and nutrients to
support the growing plant. The leaves take in light to fuel the process of photosynthesis and support the
plant with energy. In the picture below, the seed is shriveled and has supported the plant until the roots
and leaves were developed and could support the plant.
The reason for such a range in wheat development in one field is the availability of soil moisture. This is
the key component for wheat germination and early development. If at any point during the process, after
germination has began, there is a severe lack of soil moisture and the shoots/roots become necrotic
(plant cells die), the plant will likely die. Additionally, once a wheat seed has germinated, it will not
germinate again. This is because there is only one set of structures and enough nutrients for a single
germination event.
First Hollow Stem in Wheat
Wheat is developing rapidly now and is earlier than normal in much of Kansas. Producers should start examining plants now to determine if the wheat has reached the "first hollow stem" (FHS) stage. This stage occurs as the wheat switches from the vegetative stage to the reproductive stage of growth.
When the leaf sheaths become strongly erect, the growing point, which is below the soil surface, will soon begin to develop a tiny head. Although the head is quite small at this point, it has already established some important yield components. At this stage, the maximum potential number of spikelets is determined. Sufficient nitrogen (N) should already be available in the root zone at growth stage in order to affect the potential number of seeds per head.
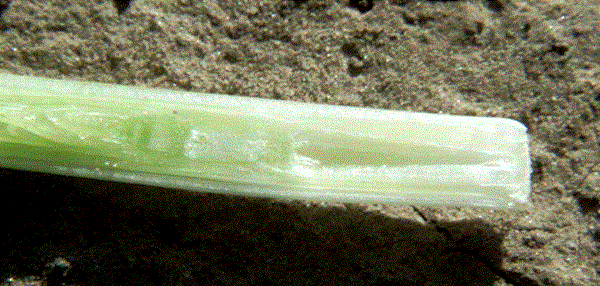
Once the embryo head has developed, the first internode will begin to elongate pushing the head up through the leaf sheaths. This first internode will be hollow. This will be visible before you can actually feel the first node (joint, located just above the first internode). Prior to this stage the nodes are all formed but tightly packed together and hard to see.
FHS is the point at which a half-inch or so of hollow stem can first be identified above the root system and below the developing head. FHS occurs when the developing head is still below the soil surface, which means that producers have to dig plants out of the ground to do the examination.
To look for FHS, start by digging up some plants from fields that have not been grazed. Select the largest tillers to examine. Cut off the top of the plant, about an inch above the soil surface. Then slice the stem open from the crown area up. Look for the developing head, which will be very small. Next, see if you can find any hollow stem between the developing head and the crown area. If there is any separation between the growing point and crown, the wheat plant is at FHS. FHS will occur between a few days and a week or more prior to jointing, depending on temperatures.
If the wheat has reached FHS, cattle should be removed to prevent grain yield loss. Yield losses from grazing after FHS may be up to 1.25 bushels per day according to OSU data, although losses may not be this great for the first few days of grazing after FHS. Still, it is easy for producers to be late by a few days in removing livestock as they wait for obvious nodes and hollow stems to appear, and even the first few days can be significant.
Two things are observed when wheat is grazed too long: 1) fewer heads per acre because the primary tiller has been removed and 2) smaller and lighter heads than expected because leaf area has been removed. As cattle continue grazing, the wheat plant is stressed and begins to lose some of the tillers that would produce grain. A little later, if there is not enough photosynthate, the plant begins aborting the lower spikelets (flowers where seed develops) or some of the florets on each head. Finally, if there is not enough photosynthate during grain filling, the seed size will be reduced and if the stress is severe enough, some seed will abort.
First hollow stem. (Photo courtesy of Gene Krenzer, former Oklahoma State University Extension wheat specialist.)
Dry Soils and Root Development of Wheat
Wheat is in various stages of growth and conditions across the whole state of Kansas and we have some that still hasn't emerged in the area. It is a good idea to be scouting their fields to see how well the crop is developing, and whether there are any pests, weeds, or nutrient problems that could be solved later this fall or winter. Root development is the primary concern so far this year. This is due to the dry conditions that the wheat has been enduring so far this growing season.
Roots are important because they are the structure for taking up water from the soil, as well as nutrients. Many times we will see both drought stress and nutrient deficiencies in dry conditions.
In many cases, there are some primary roots coming out from the seed. These roots are used to take up water and nutrients throughout the whole growing season, but usually there are not very many of these roots so that can't support a plant with one or two tillers for a long period. The crown root system is, or should be, much more extensive than the primary root system.
So far this year, we seem to be finding a lack of crown root development. This is due to a lack of moisture in the topsoil. The crown roots are often called the secondary roots. Crown roots take up most of the water and nutrients from the soil, so they are very important for the plant to survive the winter. In addition, the crown roots provide the anchoring of the plant. They are especially important when grazing wheat. By this point in the season, there should be a much more extensive crown root system than what I am finding in many wheat fields. The warm fall actually would promote more root development, but the lack of moisture has actually put additional stress on the primary roots to support the plant.
All we really need is some moisture in the crown area of the soil and these roots would begin developing. They will not develop quickly after the plant goes into dormancy. The wheat plant will resume more rapid root development early in the spring and can continue to grow roots until the primary plant growth is completed.
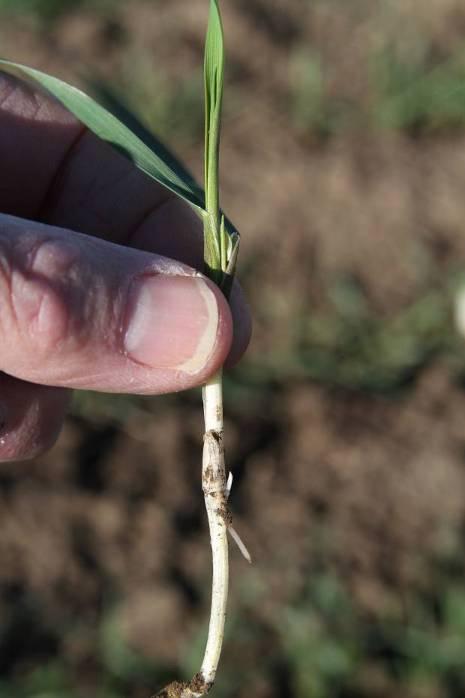
Photo 1. Wheat plant with only one, very short crown root on November 14, 2012 at the Agronomy North Farm near Manhattan. The crown root system should be much more fully developed by this point, but has been delayed by dry topsoil conditions. Photo by Jim Shroyer, K-State Extension.

Photo 2. After another month's growth, wheat from the same field as in the photo above, has crown roots 9 to 10 inches long. This is what you'd like to see. This photo, taken a few years ago, got off to a slow start due to dry soils (similar to this year), but grew quickly once the wheat received some moisture.